conda install -y -c fastai -c pytorch -c anaconda anaconda fastai nbdevCollecting package metadata (current_repodata.json): doneIn order to contribute to fastai (or any fast.ai library… or indeed most open source software!) you’ll need to make a pull request, also known as a PR. Here’s an example of a pull request. In this case, you can see from the description that it’s something that fixes some typos in the library. If you click on “Files changed” on that page, you can see all the changes made. We get notified when a pull request arrives, and after checking whether the changes look OK, we “merge” it (which means that we click a button in GitHub that causes all those changes to get automatically added to the repo).
Making a pull request for the first time can feel a bit over-whelming, so I’ve put together this guide to help you get started. We’re going to use GitHub’s command line tool gh, which makes things faster and easier than doing things through the web-site (in my opinion, at least!). To install gh on Linux follow the instructions given here. To install gh on Mac type: brew install github/gh/gh.
I’m assuming in this guide that you’re using Linux, and that you’ve already got Anaconda or Miniconda set up. This is the default in all of the fast.ai course guides, and is highly recommended. It should work fine on Mac too, although I haven’t tested it. On Windows, use Ubuntu on WSL.
This document is created from a Jupyter Notebook. You can run the notebook yourself by getting it from here. You’ll need to install the Jupyter Bash kernel.
ghTo develop fastai, you’ll need to install fastai and nbdev (this also checks you have the latest versions, if they’re already installed):
conda install -y -c fastai -c pytorch -c anaconda anaconda fastai nbdevCollecting package metadata (current_repodata.json): doneNB: if you’re using miniconda instead of Anaconda, remove -c anaconda anaconda from the above command.
nbdev is a framework for true literate programming; see this article to learn why you should consider using it for your next project (and why we use it for fastai).
You’ll need to set up ssh access to GitHub, if you haven’t already. To do so, follow these steps. Once you’ve created an ssh key (generally by running ssh-keygen), you can copy the contents of your .~/ssh/id_rsa.pub file and paste them into GitHub by clicking “New SSH Key” on this page.
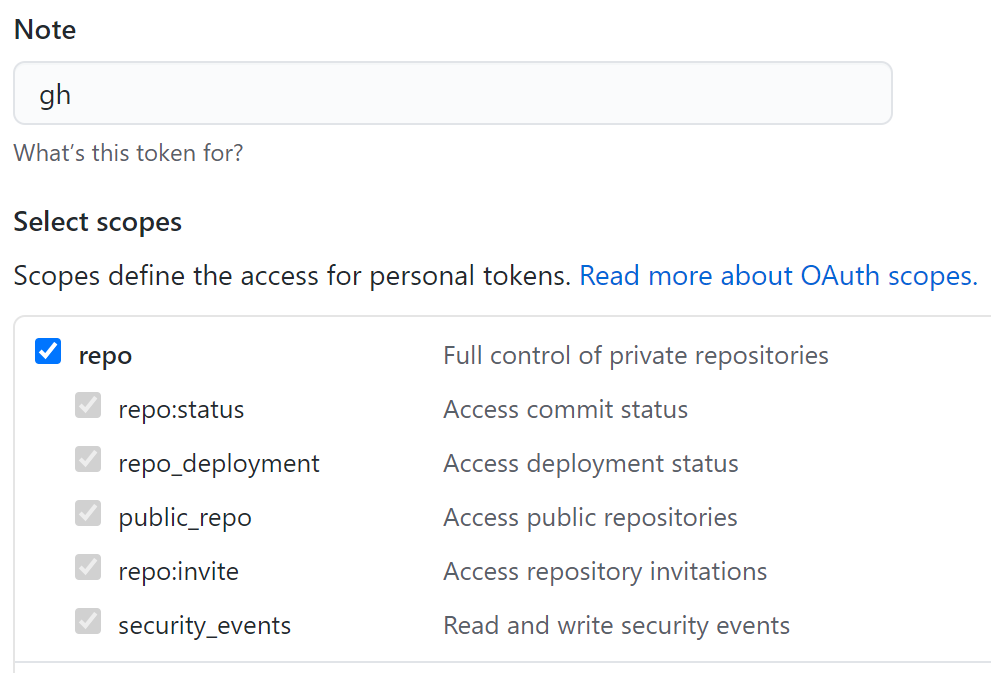
Once that’s working, we need to get a personal access token to allow gh to connect to GitHub. To do so, click here and enter “gh” in the “Note” section, and click the repo, read:discussion, and read:org checkboxes (note that gh can do this automatically for you, but it only works conveniently if you’re running the code on your local machine; most fastai developers are probably using a remote GPU server, such as Paperspace, AWS, or GCP, so we show the approach below because it works for everyone).
Then click “Generate Token” at the bottom of the screen, and copy the token (the long string of letters and numbers shown). You can easily do that by clicking the little clipboard icon next to the token.

Now run this in your shell, replacing jph01 with your GitHub username, and the string after TOKEN= with your copied token:
GH_USER=jph01
TOKEN=abae9e225efcf319f41c68f3f4d7c2d92f59403e
Setup gh to use ssh to connect to GitHub, so you don’t have to enter you name and password all the time:
gh config set git_protocol sshCreate your GitHub authentication file:
echo -e "github.com:\n user: $GH_USER\n oauth_token: $TOKEN\n" > ~/.config/gh/hosts.ymlfastcoreNow we’re ready to clone the fastcore and fastai libraries. We recommend cloning both, since you might need to make changes in, or debug, the fastcore library that fastai uses heavily. First, we’ll do fastcore:
gh repo clone fastai/fastcoreCloning into 'fastcore'...
remote: Enumerating objects: 247, done.
remote: Counting objects: 100% (247/247), done.
remote: Compressing objects: 100% (164/164), done.
remote: Total 1618 (delta 162), reused 139 (delta 78), pack-reused 1371
Receiving objects: 100% (1618/1618), 3.18 MiB | 18.61 MiB/s, done.
Resolving deltas: 100% (1102/1102), done.We update our installed version to use editable mode. This means that any changes you make to the code in your checked-out repo will automatically be used everywhere on your computer that uses this library:
cd fastcore
pip install -qe .
We update the repo to create and use a fork:
gh repo fork --remote- Forking fastai/fastcore...
! jph01/fastcore already exists
✓ Renamed origin remote to upstream
✓ Added remote originBecause all fast.ai libraries use nbdev, we need to run nbdev_install_hooks the first time after we clone a repo; this ensures that our notebooks are automatically cleaned and trusted whenever we push to GitHub:
nbdev_install_hooksExecuting: git config --local include.path ../.gitconfig
Success: hooks are installed and repo's .gitconfig is now trustedfastaiNow we’ll do the same steps for fastai:
cd ..
gh repo clone fastai/fastai
cd fastai
Cloning into 'fastai'...
remote: Enumerating objects: 108, done.
remote: Counting objects: 100% (108/108), done.
remote: Compressing objects: 100% (79/79), done.
remote: Total 10206 (delta 41), reused 57 (delta 27), pack-reused 10098
Receiving objects: 100% (10206/10206), 536.85 MiB | 38.67 MiB/s, done.
Resolving deltas: 100% (8053/8053), done.
Already up to date.We’ll do an editable install of fastai too:
pip install -qe .[dev]…and fork it and install the git hooks:
gh repo fork --remote- Forking fastai/fastai...
! jph01/fastai already exists
✓ Renamed origin remote to upstream
✓ Added remote originnbdev_install_hooksExecuting: git config --local include.path ../.gitconfig
Success: hooks are installed and repo's .gitconfig is now trustedEverything above needs to be done just once. From here on are the commands to actually create your PR.
Create a new git branch, by running the following, replacing test-pr with the name you want to give your pull request (use something that will be easy for you to remember in the future if you need to update your PR):
git checkout -b test-prM docs
Switched to a new branch 'test-pr'Make whatever changes you want to make in the notebooks, and remember to run nbdev_build_lib when you’re done to ensure that the libraries are built from your notebook changes (unless you only changed markdown, in which case that’s not needed). It’s also a good idea to check the output of git diff to ensure that you haven’t accidentally made more changes than you planned.
When you’re ready, commit your work, replacing “just testing” here with a clear description of what you did in your commit:
git commit -am "just testing"[test-pr 3397cc9] just testing
2 files changed, 2 insertions(+), 1 deletion(-)The first time you push from your fork, you need to add -u origin HEAD, but after the first time, you can just use git push.
git push -u origin HEADCounting objects: 4, done.
Delta compression using up to 64 threads.
Compressing objects: 100% (4/4), done.
Writing objects: 100% (4/4), 383 bytes | 383.00 KiB/s, done.
Total 4 (delta 3), reused 0 (delta 0)
remote: Resolving deltas: 100% (3/3), completed with 3 local objects.
remote:
remote: Create a pull request for 'test-pr' on GitHub by visiting:
remote: https://github.com/jph01/fastai/pull/new/test-pr
remote:
To github.com:jph01/fastai.git
* [new branch] HEAD -> test-pr
Branch 'test-pr' set up to track remote branch 'test-pr' from 'origin'.Now you’re ready to create your PR. To use the information from your commit message as the PR title, just run:
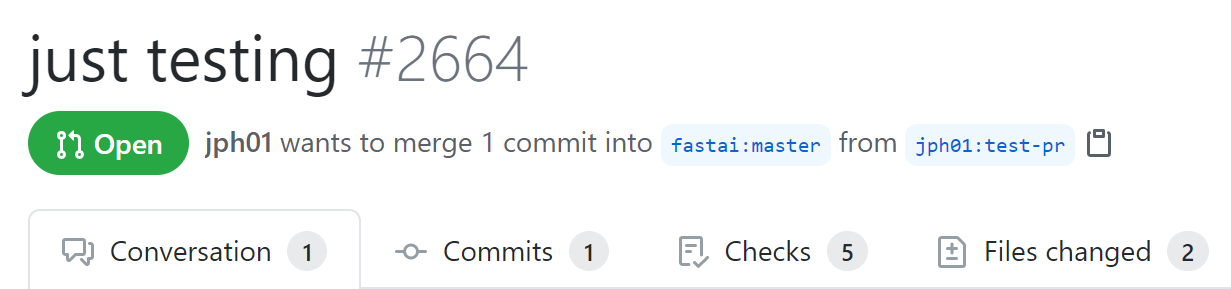
gh pr create -fhttps://github.com/fastai/fastai/pull/2664To be interactively prompted for more information (including opening your editor to let you fill in a detailed description), just run gh pr create without the -f flag. As you see above, after it’s done, it prints the URL of your new PR - congratulations, and thank you for your contribution!
To keep your fork up to date with the changes to the main fastai repo, and to change from your test-pr branch back to master, run:
git pull upstream master
git checkout master
From github.com:fastai/fastai
* branch master -> FETCH_HEAD
Already up to date.
M docs
Switched to branch 'master'
Your branch is up to date with 'upstream/master'.In the future, once your PR has been merged or rejected, you can delete your branch if you don’t need it any more:
git branch -d test-prDeleted branch test-pr (was 514782a).
(base) : 1